Personal server — How to setup and configure
In a digital era that is evolving to a surveillance nightmare, self hosting needs to become the norm… Get back to the roots, to understand…

In a digital era that is evolving to a surveillance nightmare, self hosting needs to become the norm… Get back to the roots, to understand the rotten leaves.
In this guide I’ll explain how to create your own home server, from scratch. Without using any pre-installed operating systems, but flashing a fresh ubuntu server into the hardware of your choice, and configuring it to have a secure and ready device to act as a home server.
As I keep adding new software into it, I’ll keep creating and uploading more guides to explain how I’ve installed and I’m using the other pieces of software. Keep tuned if you want to learn how to become a sovereign Internet Ninja, and stop giving your private data to big companies, who will just benefit from you.
Problem
We depend heavily on third-party services, both for our data and for our money. We are constantly under surveillance for our actions, and we cannot be free until we understand how to use digital services privately.
The constant surrender of our data allows large corporations to do business with them, and they have to spend more and more materials, resources, and energy on data centers to manage them.
Solution
Install services and applications on a computer hosted at home.
Stop giving your data away for other’s benefits and manage to be truly free in the digital world, without losing any advantages when using the Internet with our own electronic devices.
Give a purpose to devices that would otherwise end up in the trash, contributing to reducing waste and promoting the reuse of obsolete computer materials.
Self-hosting services and using open-source programs benefit both us and our planet.
Revolution begins with small gestures. If we understand the power we have and use it, it will never be taken away from us again.
Become a sovereign individual.
Installation
0. Preparations
Before starting to get our hands dirty, it is important that we have all the necessary material to build our own home server. Otherwise you’ll need to rush to the hardware shop to buy the weirdest adapter you can think of cause your server does not have a certain port.
Make sure you know which ports you can use with your new hardware, to connect the following pieces to it:
- Screen
- Keyboard
- Ethernet Cable
- External USB attached storage (HDD or SDD)
- A pen drive
Once we’ve got everything, we can start preparing our new setup.
Without plugging it to the wall, connect your server to your router using an Ethernet cable, attach the external storage through USB or SATA, and connect both the keyboard on a USB port, and the screen with an hdmi or display port cable.
Now, before starting your server, we will prepare the new operating system that will power your machine. In this case, we will be using Ubuntu Server 22.04. You can find the download link here: https://ubuntu.com/download/server
Download the latest version and store it locally on your computer.
Now also download (if you still don’t have it) Balena Etcher: https://etcher.balena.io/ → this software will be useful each time you want to flash an operating system to one of your devices.
Finally, plug in your pen drive, open Balena Etcher, and choose the file you just downloaded (ubuntu server .iso file) to be flashed on your pen drive.
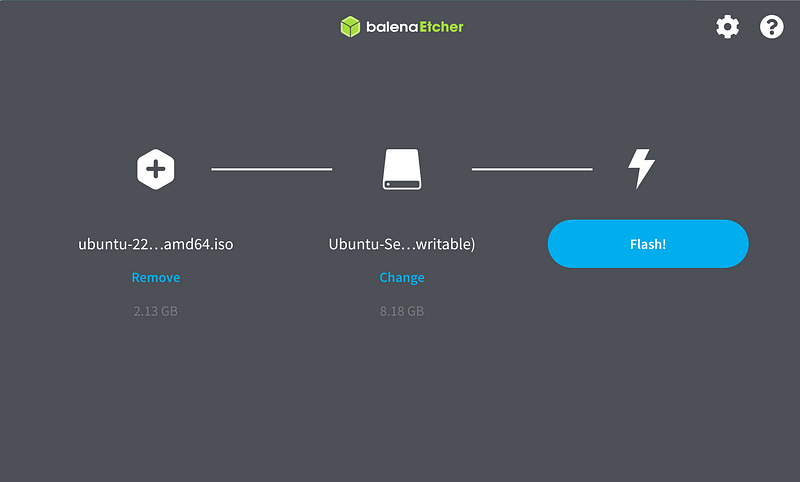
After the flashing is completed, you can remove the pen drive, and we will be ready to start the real installation of your home server.
1. Installing the Operating System
Installation and walk-through of the steps, and special attention into using the full disk but also external disk and creating a data structure for it to be mounted to (/mnt).
BEFORE turning on your server for the first time, plug the USB pen drive that you previously flashed Ubuntu Server into it.
Now, we can start the server for the first time. Plug it to the electricity, and press the button to start it up if there is one.
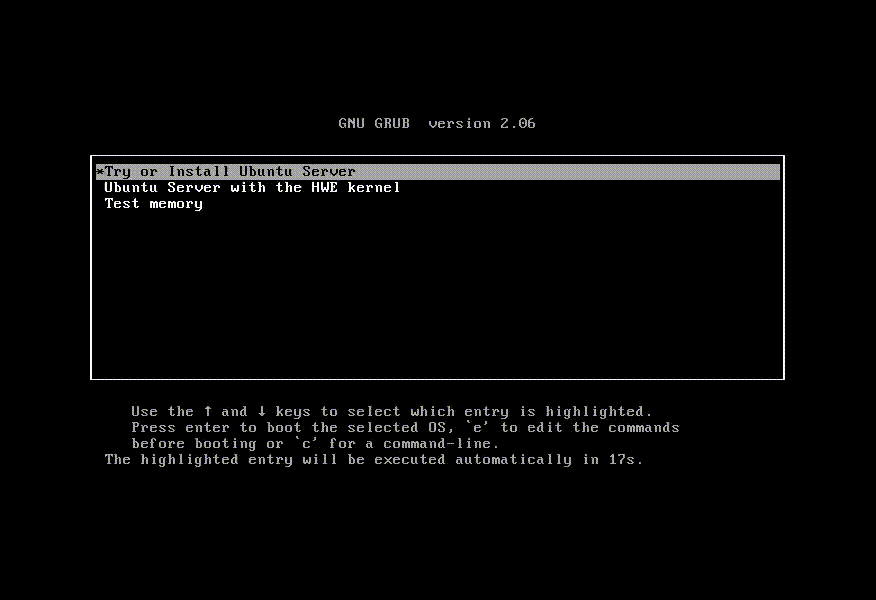
Usually you will be automatically shown with a window to do different actions on the first boot. At this stage you either need press one of the keys that should be indicated to enter the boot menu, or simply go through the list of available options with your keyboard arrows, and click enter on the boot menu option.
There you’ll see the option to boot from the removable device (pen drive). Click on that one. You will now start the process of flashing the full new operating system into your home server.
Use the UP, Down, and ENTER keys of your keyboard to navigate to the options. Follow the next instructions:
1. On the first screen, select the language of your choice (English recommended)
2. If there is an installer update available, select “Update to the new installer”, press enter, and wait
3. Select your keyboard layout and variant (Spanish recommended to Spanish native speakers) and press [done]
4. Keep selecting “Ubuntu Server” as the base for the installation, down to [done], and press enter
5. Select the interface network connection that you choose to use (Ethernet recommended) and take note of your IP obtained automatically through DHCP. (Normally 192.168.x.xx). Press [done]
note that we will be assigning a static IP to the server later
6. Leave the empty next option if you don’t want to use an HTTP proxy to access it. Press [done]
7. If you don’t want to use an alternative mirror for Ubuntu, leave it empty and press [done] directly
8. On the storage layout, let’s stop a little bit more and make sure we understand what we’re doing here (the filesystem configuration is VERY important for your server to operate correctly).
8.1. Check “Use an entire disk”, if you have only one primary unit storage (1+ TB). In this case, ensure that you uncheck “Set up this disk as an LVM group” before select [done] and press enter. Then, continue with step 9.
8.2. Check “Custom storage layout”, if you want to use one secondary disk, e.g. primary for the system and secondary disk for data. Make sure this disk is mounted, and format it if you have doubts that it could still have data that you don’t need.
In my case, I followed the 2nd option as I have an internal disk for the system, and some of the apps, and another external HDD disk for other data that I want to keep separated from the main system in case something happens to it.
In the future, you should see your filesystem in a similar way to this one:
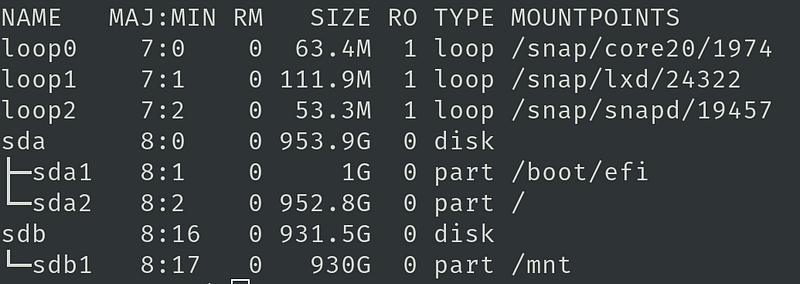
Check out how we have both the home directory (/) mounted on the sda2 partition, and the external storage directory (/mnt) mounted on the sdb1 partition.
9. Confirm destructive action by selecting the [Continue] option. Press enter
10. Keep selecting “Skip for now”, when the “Upgrade to Ubuntu Pro” section appears you press enter on the done button
11. Choose your username and password. Make sure they are not easy to guess or passwords that may have been leaked on the internet. Even if we will not be opening the server to the public internet, security should never be disregarded.
12. Press enter to check “Install OpenSSH server” by pressing the enter key, and down to select the [Done] box and press enter again
13. If you want to preinstall some additional software (not recommended, they can be installed later), select them, if not, press [done] directly to jump to the next step.
14. Now all before configurations will be applied and the system installed. This would be a few minutes depending on the hardware used. You can show extended logs by pressing [View full log] if you want.
⌛ Wait until the installation finishes, when it happens, [Reboot now] will appear. Select it and press enter.
15. When the prompt shows you “Please remove the installation medium, then press ENTER”, extract the pen drive of the PC and press enter finally.
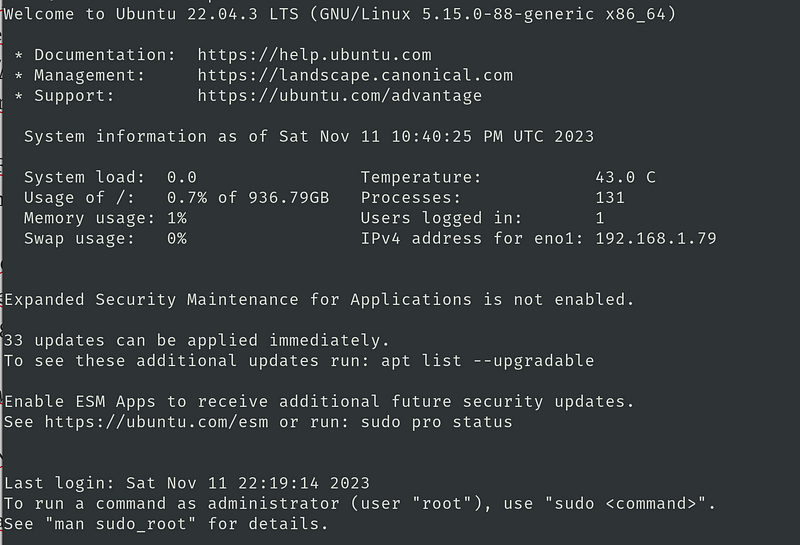
Now the PC should reboot and show you the prompt to log in. You can disconnect the keyboard and the screen, and proceed to connect remotely from your regular computer to continue with the installation.
2. Acessing remotely (SSH)
Connecting the screen and keyboard to the server directly are a good last resource to use it, but ideally we want to be able to access it from anywhere. Specially when we are next to it at home, but also in case we install some apps that we want to use in our day to day, we need a way to connect remotely to it, and if possible, secure and privately.
That’s why instead of using the screen and keyboard, we will now log in to our server through SSH. SSH is a protocol called Secure SHell, which allows us to create an encrypted and secure connection between two devices.
To do so, we will open the terminal in our personal computer, and type the following command:
ssh <user>@<server-IP>The server IP will be shown in your server screen if you still have it plugged. Otherwise you can find it by using an app like https://www.fing.com/products/fing-app , which detects the devices that are connected in the same network as you are.
IMPORTANT: Make sure you are connected to the same wifi as your personal server, otherwise Fing will be useless.
Once identified, you can access your server through ssh using that IP and the username you chose previously.
Usually the IP’s have this form: 192.168.XXX.XXX
Cool! Now you should be logged inside your server! Congrats 😉
However, there is still one little problem. This way of connecting to the server is cool, but only works if we find ourselves in the same network as the server. So effectively, only when we are home we can connect to it.
That’s why the first thing that we will do to our server, is blind it from the outside, and install a private VPN to be able to connect to it from the outside without worrying on being exposed to the internet.
Let’s keep going!
3. Initial Configurations
To make sure our communications with the server are secure, we will now apply some security and proper usability measures.
- Make your user a super user
sudo usermod -a -G sudo <user>2. (optional) Login with SSH keys
Instead of entering our server password each time, we can also configure it to ONLY allow certain devices to connect to it.
To do so, we need to add our own SSH key into the .ssh/athorized_keys by typing
sudo nano .ssh/authorized_keysand adding our SSH keys into it. If you don’t have an SSH key, you can create one by executing this command:
ssh-keygen -t rsa -b 2048Then simply copy paste the content of the generated key inside the authorized_keys file, and you’ll be ready to log in authenticating with your private SSH key, instead of using the password.
3. Since in our case we have created a directory mounted in the attached disk, we will give enough permissions to our user to access it without problems. In our case, the mounted directory in the secondary storage is /mnt.
sudo chown <user>:<user> /mnt4. We’ll start with assigning a static IP to our server. We don’t want to discover each time we connect it to a network if the IP has changed, so that’s why we will assign a static one to it. You can choose the one you want (that is not already in use) on the range from 192.168.1.2 to 192.168.1.254.
To modify the current network configuration, we need to edit the following file:
sudo nano /etc/netplan/00-installer-config.yamlAnd add the following lines:
network:
  ethernets:
    eno1:
      dhcp4: false
      dhcp6: false
      addresses:
      - 192.168.1.79/24
      nameservers:
        addresses:
        - 9.9.9.9
        - 149.112.112.112
        search: []
      routes:
      - to: default
        via: 192.168.1.1
  version: 2
If you don’t want to break your current ssh session, make sure to use the same IP that you were assigned previously by your router to the static IP.
Note: I’ve also modified the nameservers to use the Quad9 ones due to higher privacy in their end. You can choose the ones you prefer.
Save and close the editor, and run the following command:
sudo netplan applyNow your IP address and DNS servers should be modified.
To check it you can either run ip a , ifconfig and resolvectl status , and you should see the new values there.
5. Finally we will configure and start the pre-installed firewall from our linux server: UFW (Uncomplicated Firewall).
Run the following commands:
$ sudo ufw default deny incoming
$ sudo ufw default allow outgoing
$ sudo ufw allow 22/tcp comment 'allow SSH from anywhere'
$ sudo ufw logging off
# Enable ufw, when the prompt shows you "Command may disrupt existing ssh connections. Proceed with operation (y|n)?", press "y" and enter
$ sudo ufw enable
5. Connecting from the outside (Tailscale)
Alright, we’ll be almost done for today, but there is one last thing missing.
Now that we have our server properly secured and configured, it would be ideal to be able to access it from the outside without sacrificing our privacy.
That’s why we will be using a private VPN software called Tailscale. This VPN is effectively a WireGuard tunnel that requires 0 knowledge to set up.

The cool thing, is that even if we use a 3d party service to communicate with our personal devices, they cannot see anything cause all the traffic is End to End Encrypted (E2EE). Tailscale just helps our devices identify them, and communicate between them securely, without compromising the data that they are sending.
When you want to create your own private network with Tailscale, you’ll need to use an account to connect to your devices between them. And this will be the account that you’ll use in all of them.
Tailscale offers a variety of different options to log in. In my case I’m using Github.
So we’ll go to their website https://tailscale.com and click on “Try for free”.
Then we’ll be prompted with the option to log in, and we’ll need to choose which service provider we’ll be using.
Enter your authentication details, and you’ll have created your tailscale account.
Installing Tailscale on our devices
Once inside, we want to start adding new devices.
The easiest way is by clicking on “Add new device” on the top left part of your admin dashboard. You’ll see there the different options depending on your device operating system.

For mobile, and desktop clients, we can download the Tailscale apps, and simply go through the same procedure we’ve done up until now.
Your devices will start appearing in your dashboard as soon as you log in to your tailscale account through one of them. But take into account that you must individually approve each one of the devices from your administration dashboard.
However, for our servers, it’s a little bit more tricky. We will need to log in to our server through ssh the first time we want to connect it to tailscale.
Once we’re inside, we will need to execute the command provided by tailscale:
sudo curl -fsSL https://tailscale.com/install.sh | shThis will install all the libraries and packages needed for tailscale to run properly. After the installation is complete, run the following command in your server’s terminal:
sudo tailscale upCopy the URL that it gives you in the terminal output, and paste it in your browser. Log in with the same account you used previously, and you’ll now have your server connected through a WireGuard Tunnel with your other devices!
Voilà, without opening ports, or fighting with your network settings!
However, we will indicate to our firewall a new rule:
sudo ufw allow in on tailscale0
sudo ufw reload
Now you’ll see that Tailscale has assigned some IPs to your different connected devices. This IPs will be the ones we will use to access (almost) all our self-hosted applications. Connecting to them through Tailscale brings security and privacy benefits, as all the traffic that goes through your mesh Tailscale network, will be E2EE, so no one can eavesdrop on your traffic even if they are inside your home network.
If you would like now to even increase the security of your node by only allowing to log in using Tailscale, you can follow this guide: https://tailscale.com/kb/1077/secure-server-ubuntu-18-04/
Quick tip: After approving your new device from the Tailscale dashboard website, click on Machine Settings > Disable key expiry. This will ensure that the server is ALWAYS connected to your private network, and you don’t need to go home to reauthenticate every a couple of days.
6. Final Check — Rebooting
There you are, your new personal home server is ready to start installing apps into it!
We now have it protected from the outside internet traffic, and we can connect to it through Tailscale from anywhere in the world.
Let’s make a final reboot, and make sure that once we log in again everything is correct. If not, you missed some of the steps and should check out what’s the problem that needs to be solved before proceeding!
Apply the reboot with sudo reboot now and after some minutes, try logging in but this time using the Tailscale IP, instead of your local network one.
If you manage to log in, Tailscale is working fine. Now check that the filesystem is still correctly mounted with lsblk and in case the system needs it, apply the necessary updates.
After this, I can only say: Congrats. You’re on the correct path of becoming an Internet Ninja.