Internet Educational Series #8: IP Tunnels
Time travel may be still be pure fiction, but what space travelling?

In previous articles we talked about the different protocols used to configure the net and devices, how we protect from malicious behaviors, how to identify devices inside a network and route packets between them, and how we use browsers to access different files from the Internet.
However, we’ve been talking about public and private networks all this time, and we still don’t know how to connect between them. We know how to translate addresses using NAT, but this new addresses should be able to connect to other private networks, or at least find an “intermediary” network to route the packets through.
The tunneling solution
A tunnel is essentially a network communications channel between two networks.
Tunnels are used to transport another network protocol by encapsulating its packets.
They can be seen as Source Routes that circumvent conventional routing mechanisms.
If the tunnel is built at IP layer it is named IP tunnel.
To implement them, some routers must have two IP addresses to identify themselves, a public (outer) and a private (inner) one.
The outer router IP addresses identify the “endpoints” of the tunnel.
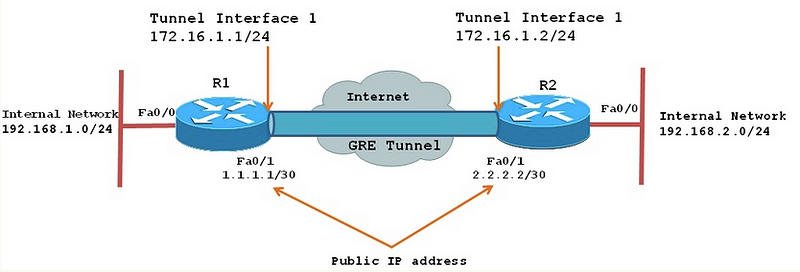
The image above represents a certain type of tunnel (GRE), which we will talk about it later, but just for understanding the general picture, take a look at the different IP addresses that appear in it.
We can see first of all two Class C addresses that identify the router inside each one of their private networks (192.168.1.0/24 for R1 and 192.168.2.0/24 for R2), and another IP address that identifies them in the public network, Internet (1.1.1.1/30 for R1 and 2.2.2.2/30 for R2).
Additionally note that we do also have 2 more IP addresses. These correspond to the tunnel, where we want to send the packets through.
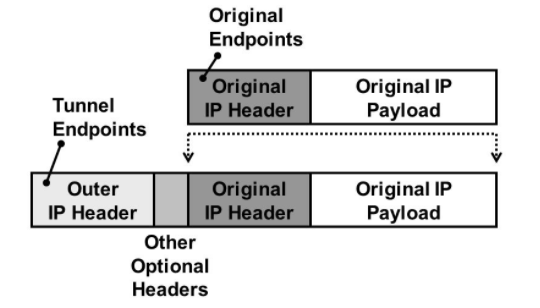
When we use an IP tunnel, we may want to send other types of datagrams through that tunnel, and that’s why we encapsulate packets inside another packet, whose format is native to the public network.
There are several encapsulation protocols, to accomplish this.
- IP as encapsulation protocol itself (ipencap, 6in4, 4in6…)
- Other encapsulation protocols (SSH, TLS, IPsec…)
IP encapsulation protocol
Here we will analyze the first encapsulation protocol, as the other ones are quite different and made for a specific purpose.
To use the IP encapsulation method, each router creates a new network pseudo-device, which is associated to the outer IP address (take a look at the the “tunnel addresses” we mentioned with the previous image).
When a packet is sent through this pseudo-device, it is encapsulated on a IP packet and sent to the other remote border router.
Then, when a packet is received through this pseudo-device, the payload is extracted and treated as an incoming real IP packet.
Note: This network pseudo-device ONLY accepts IP packets from the other border router.
When we want to use the IP encapsulation method, we must include a new entry to the routing table to indicate which packets will be sent through the IP tunnel.
P.ex:
Destination		Gateway		Genmask			Iface
...  ...
192.168.2.0		0.0.0.0		255.255.255.0	tunnel0
...  ...
This entry would tell the router that any packet towards 192.168.2.0/24 will be sent through the tunnel0 network pseudo-device, encapsulated in another IP packet, and sent to the other remote border router.
The outer IP packet
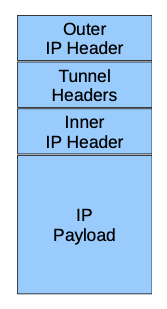
- Outer IP Header → Includes:
- IP source and destination addresses (“endpoints” of the tunnel)
- IP protocol field: type of encapsulation used
- Tunnel Header: some encapsulation types define a specific tunnel header to introduce extra parameters.
- The encapsulated inner IP packet
Let’s see some of the encapsulation types:
- IP in IP encapsulation
(does not have tunnel headers)
- GRE (Generic Routing Encapsulation)
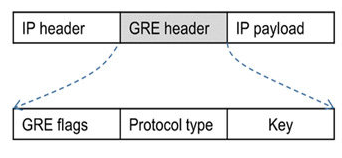
Inside the IP payload we find the Inner IP Header and the Inner IP Payload.
The “Delivery Header” includes the Outer IP Header and the Tunnel Headers.
- IPsec (Internet Protocol Security)
This one is an encapsulation method worth mentioning because it can provide authentication by using Authentication Headers (AH), encryption by using Encapsulating Security Payloads (ESP), and finally mutual authentication at the beginning of the session and negotiation of cryptographic keys to be used during the session (Security Associations, SA).
Configuration of Tunnels
To configure tunnels in Linux systems, we will use the command ip tunnel.
Command options:
ip tunnel show - lists tunnels
ip tunnel add - add a new tunnel
ip tunnel change - change an existing tunnel
ip tunnel delete - destroy a tunnel
name NAME - select the tunnel device NAME
mode MODE - select the tunnel mode (modes for ipv4: ipip, sit, isatap and gre)
remote ADDRESS - set the remote endpoint of the tunnel
local ADDRESS - set the fixed local address for tunneled packets. It must be an address on another interface of the local host.
ttl N - set a fixed TTL “N” on tunneled packets. N must be in the range 1-255. 0 means that the packets inherit the TTL value, which is the default value.
dev NAME - bind the tunnel to the device NAME so that tunneled packets will only be routed via this device and will not be able to escape to another device when the route to endpoints changes.
nopmtudisc - disable Path MTU Discovery on this tunnel. It is enabled by default. Note that a fixed TTL is incompatible with this option (tunneling with a fixed ttl always makes pmtu discovery).
Despite being one of the shortest articles of the series, understanding how tunnels work on the Internet is a really powerful tool. I hope you got at least a first glimpse on what they are, and this article encourages you to do more research about the topic, as it is continuously being developed, and a lot more information can be found out there about tunneling.
In case you want to learn more about this topics, feel free to check my previous articles:
- Chapter 1: Ethernet, Switching & VLANs
- Chapter 2: IP Basics
- Chapter 3: Network Apps
- Chapter 4: DNS
- Chapter 5: DHCP
- Chapter 6: WWW (HTTP(S), HTML, Cookies…)
Finally, this series will reach to the 10th episode, so if you’ve liked my content please leave a clap, it makes a huge difference for me and keeps me motivated to write more articles!