Internet Educational Series #6: WWW (HTML, HTTP(S), Cookies…)
How does the Internet provide websites to our home computers? Learn about the protocols used in the web, browsers, and the methods used to…

How does the Internet provide websites to our home computers? Learn about the protocols used in the web, browsers, and the methods used to access resources from around the world.
In this chapter you’ll find an introduction to the protocols & languages used in the World Wide Web.
Content:
- History
- HTML
- HTTP Motivation
- URL/URI
- HTTP 1.0
- Cookies
- HTTP Proxies
- Dynamic Web
- HTTP 1.1
- Related RFCs
- Practical HTTP with nginx
- HTTPS (Secure HTTP)
History
Tim Berners-Lee is credited with having created the initial World Wide Web (WWW) during 1985–1991, while he was a researcher at the European High-Energy Particle Physics lab at CERN (Centre Européen de Recherche Nucléaire).
In this context, a multi-platform tool was needed to enable sharing documents between physicists and other researchers in the high energy physics community.
Tim Berners-Lee wrote a proposal that was a solution for enabling such
collaboration.
Four basic technologies were part of his proposal:
- HTML (HyperText Markup Language): a language to write documents.
- HTTP (HyperText Transfer Protocol): a protocol to transmit resources (like HTML documents).
- A WEB server: a software that serves resources like HTML documents.
- A WEB browser: a software that acts as client to send requests and process responses for resources available on a WEB server (like HTML documents).
HTML
HTML (Hyper Text Markup Language) is not a programming language like C or Java, but it is a markup language. This means that it is used to describe how content (text, images, etc) should be displayed (normally in a web browser).
HTML files are just text files that you can edit with any editor. There are also available “HTML editors” specially designed for writing it.
Let’s analyze a HTML fragment:
<html>
    <head>
    <title> Hello World</title>
    <meta http−equiv="content−type" content="text/html; charset=UTF−8">
    </head>
    <body>
        Hello <b>World</b>!!!!!!!
    </body>
</html>
As you can see, HTML is pure text. However some of this text is considered hypertext which is the text enclosed between ‘<’ and ‘>’.
This hypertexts are called HTML tags, and they tell the browser to do something special with that text.
Some HTML tags have an opening tag and an ending tag. This is marked as <tag> ... </tag> .
Other tags however, are just composed of a single tag.
The HTML document is delimited by <html> and </html>. In addition, the HTML
document is divided in two parts:
<head>. This part is optional. If <head> exists, it can contain several labels like <title>, <meta>, etc.<body>. Inside the body is where the whole HTML document is specified. All text, images, etc. are contained between <body> and </body>.
On the other hand, we can also use tags to create hyperlinks to other resources (like other HTML documents).
This is a fundamental feature in HTML. The hyperlink tag is <a>... </a>.
Example from an HTML code:
<html>
    <head>
        <title> Hello World</title>
        <meta http−equiv="content−type" content="text/html; charset=UTF−8">
    </head>
    <body>
        Hello <b>World</b>!!!!!!!
        Go to <a href=docs/otherdoc.html> another document </a>
    </body>
</html>
You can see how it is displayed in the browser simply by copying and pasting the previous code into an HTML document and dragging it into your browser. Of course it will not link you to any other document, as the path points to a document which does not exist.
Final HTML remarks:
On the other hand, blank spaces and new lines are called ”whites”. You can add as many ”whites” as you like to make your HTML file easier to read but browsers display consecutive whites as a single space. If you need to create a paragraph, you have to use the labels <p> ... </p>. For paragraphs, the browser will adjust the text lines correctly based on the window width. If you really want to force a new line, you have to use the <br> tag.
HTML has many tags but with a few of these tags, we can have an idea about how HTML works.
Some other useful tags are:
<i> </i>Sets text in italics.<tt> </tt>Sets text in teletype.<h1> </h1>Sets text in type “header 1”. You can use numbers of headers in descending order of importance (size):<h2>:<h2>This is h2 </h2> . . .<h6>: <h6>This is h6 </h6><hr>Prints an horizontal line.<center> </center>Centers text and images.<blockquote> </blockquote>Indents text.<pre> </pre>Pre-formatted text, i.e. spaces and line breaks between these tags are maintained.<!-- text comments... -->Comments in the HTML file.- and many more tags…
HTTP Motivation
Initially, HTTP (Hypertext Transfer Protocol) arised from the necessity of creating hyperlinks in HTML documents to resources that are not on the same host.
HTTP is a text protocol and it is based on a client/server model that can be used over a TCP/IP network to deliver virtually any resource of the World Wide Web (WWW). For now, we will consider that a resource is just an HTML document. An HTTP server or WEB server is a network daemon that uses by default the well-known TCP port 80.
HTTP clients, generically called WEB Browsers (e.g. firefox or lynx), send HTTP requests to the HTTP servers asking for a resource and the server responds with the requested resource.
URL / URI
The first issue to implement HTTP is to define how to identify resources.
The identifiers used in HTTP were initially defined by Tim Berners in 1991. They were called URLs (Uniform Resource Locators) and they were first used to allow authors of HTML documents to establish hyperlinks in the WWW.
An URL is just a text string with a standard format that allows you to name a resource based on its location on the WWW. In 1994, the URL concept was incorporated into a more general concept called URI (Uniform Resource Identifier).
URI is the standard name for resource identifiers in the Internet, but the term URL is still widely used. The simplest URL/URI format is as follows:
protocol :// hostname / directory / resource
But other information can also be present in the URL:
protocol :// username : password@hostname : port / directory / resource
Important note: If in the URL there is not any resource (filename) specified, it is assumed that the client is asking for a file called index.html or index.htm.
As its name suggests, this file contains an HTML file with the website index.
On the other hand, we can use absolute or relative paths in HTTP hyperlinks. In an HTTP server, absolute paths are related to a directory called DocumentRoot.
This parameter is defined in the configuration file of the HTTP server.
For example, a typical DocumentRoot when using Linux is /var/www. In this case, the URL http://www.example.com/images/upc1.gif refers to a file called upc1.gif that is stored in the HTTP server in the directory /var/www/images.
We can see the difference between absolute and relative paths in the following piece of code:
<html>
    <head>
        <title> Hello World</title>
    </head>
    <body>
        <p>Hello <b>World</b>!!!!!!!</p>
        <p>Go to <a href=docs/otherdoc.html> another document </a></p>
        <p>You can visit the UPC home page at <a href="http://www.upc.edu">UPC home</a>. </p>
        <img src="/images/upc1.gif">
        <img src="/images/upc2.gif">
        <img src="http://www.example.com/images/upc1.gif">
    </body>
</html>
HTTP 1.0
As we already said, HTTP is a protocol that uses the client-server model.
To start using it, we do need the client to know the server port and include it in the URL.
How does it work?
First the HTTP client opens a TCP connection and sends an HTTP request to an HTTP server. If everything is correct, HTTP server returns a response which contains the requested resource.
Once the response is delivered, HTTP server closes the TCP connection.
Note: HTTP is a stateless protocol. It does not maintain information between different requests.
HTTP Requests
When we do have an HTTP request, the first line is the ONLY mandatory one. It contains:
- “Request method”
- Path to the resource
- HTTP version
Then it follows a blank line (to tell the protocol it’s the request end).
The minimal HTTP 1.0 request is something like the following:
GET / HTTP/1.0
[blank line]
GET is the most commonly used request method and it means “give me the resource X”. After the GET we find a “/” and this means the resource we are requesting is the index file of the WEB server.
Another example requesting another file would be like this:
GET /images/upc1.gif HTTP/1.0
[blank line]
In this case the client is requesting a file called upc1.gif that is stored in the HTTP server in the images directory.
Headers
Request & Responses can have header lines.
This Headers are text lines that provide additional information or functionality in requests/responses.
The usual format for Headers is: “Header-Name: value1, value2” , ending with CR+LF (blank line). The header name is NOT case-sensitive.
Examples of Headers (the both are equivalent) would be something like this:
Header1: some-long-value-1a, some-long-value-1b

Header1: some-long-value-1a
    some-long-value-1b
HTTP 1.0 defines 16 headers, though none is required. Typical headers included in the requests are:
- From (email adresses of the user who makes the request)
- User-Agent (name of the browser and OS)
An example of a request with headers would be the following:
GET /path/file.html  HTTP/1.0
From: [email protected]
User-Agent: Mozilla/5.0 (X11; Ubuntu; Linux i686; rv:24.0) Gecko/20100101 Firefox/24.0
[blank line]
HTTP Responses
HTTP Responses are also composed of text lines. The first text line of an HTTP response is the status.
Typical status lines are:
HTTP/1.0 200 OK
HTTP/1.0 404 Not Found
Let’s explain what do the numbers mean:
The first digit identifies the general category of the status:
- 1xx indicates and informational message only
- 2xx indicates success of some kind
- 3xx redirects the client to another URL
- 4xx indicates an error in the client side
- 5xx indicates an error in the server
Examples
- 200 OK
- 301 Moved Permanently
- 302 Moved Temporarily
- 303 See Other
- 404 Not Found
- 500 Server Error
- 503 Not Available
Furthermore we can also add Headers to the responses. The headers typically included in responses are:
- Server (identifies the server software)
- Date
- Last-Modified (date of last modification of the resource being returned) ← Used for caching
Final HTTP 1.0 example
Imagine we want to retrieve the file http://www.example.com/path/file.html using HTTP 1.0, the first step is to open a TCP connection with the server using the default port 80.
Then through this connection, the client can send a request like the following:
GET /path/file.html HTTP/1.0
From: [email protected]
[blank line]
And the server would respond with something like the following:
HTTP/1.0 200 OK
Date: Mon, 21 Oct 2013 22:29:59 GMT
Content-Type: text/html
Content-Length: 50
[blank line]
<html>
    <body>
        <h1>It works!</h1>
    </body>
</html>
Once the response is received, the client closes the TCP socket.
Cookies
As we explained previously, HTTP is a stateless protocol.
A cookie is a piece of information (UTF8 text) sent from an HTTP server and that is stored by the browser in the client’s filesystem.
Sometimes cookies are also called “footprints”.
These cookies provide a state (memory of previous events) into otherwise stateless HTTP transactions.
Without cookies, each retrieval of a webpage, or even a single component, is an isolated event.
The most common uses of cookies are:
- User Control (For ex: when a user enters his username and pwd, a cookie can store this information so there is no need to enter them again in a later visit to the web server).
- Getting information about user’s browsing habits.
How do cookies work?
The HTTP server sends lines with the Set-Cookie header if the server wishes the browser to store these cookies.
Set-Cookie is a directive for the browser to store the cookie and send it back in future requests to the server (subject to expiration time or other cookie attributes).
Let’s see a visual example:
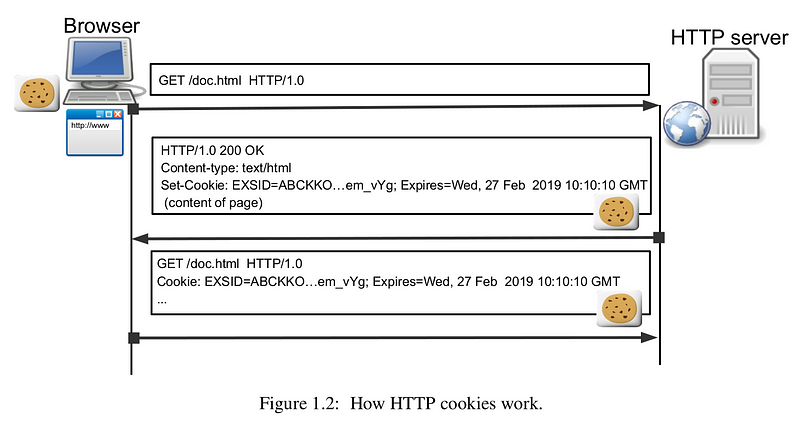
We can describe the process going on in the above picture:
- The client sends a regular request.
- The server asks the client to store that cookie.
- The client sends the cookie in a subsequent request, when it is needed.
It is worth knowing that the cookies do have more fields, like path and domain, which help in deciding when to send it or not.
As you can imagine, cookies can cause (and are actually causing) privacy problems.
HTTP Proxies
An HTTP proxy is a program that acts as an intermediary between a browser and a Web Server.
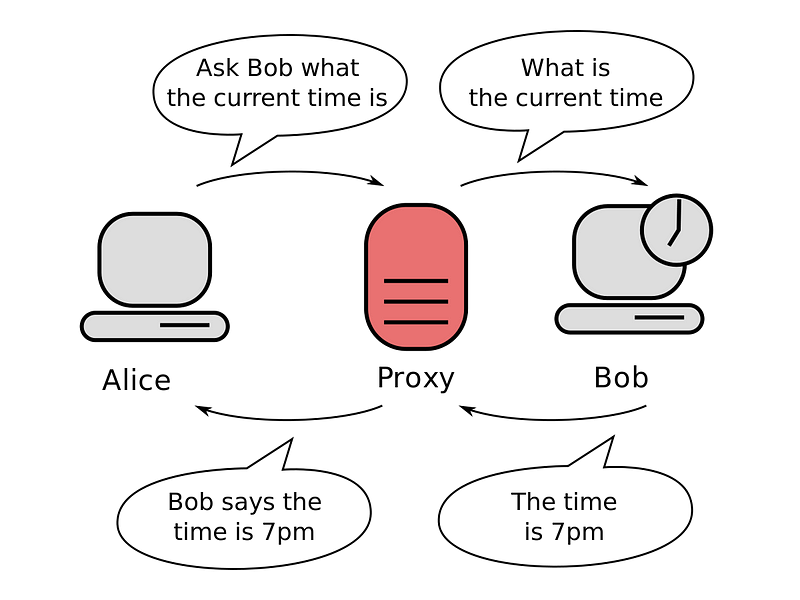
HTTP proxies are commonly used for security (a single point of control) and efficiency (caching).
There are two basic types of proxies (from users point of view):
- Tranparent: A transparent proxy intercepts normal communication at the network layer without requiring any special client configuration. Clients do not need to be aware of this proxy existence.
- Non Tranparent: This types of proxies receive requests from the clients and sends the requests to the servers. The responses go the same way back also using the proxy. Therefore, a proxy must have functions of either client & server. A non-tranparent proxy can use another transparent or non-transparent proxy to reach the final server.
Clients send their requests to the proxy instead of the real server specified in the URL. ← The proxy IP address and port is defined in the browser
HTTP requests using a non-transparent proxy must include the full URL of the resource (not only relative path), as the proxy has to know which server it must send the HTTP request.
A request using a non-transparent proxy would be something like this:
GET http://www.somehost.com/path/file.html HTTP/1.0
[blank line]
Lastly, it is nice to know there are many Open Source Proxies used widely.
Dynamic Web
In today’s Web, the content is not static, but documents are generated on the fly by servers with information provided by clients.
As a result, WWW is not a huge database of documents, but a platform to implement services & applications.
Common applications of the dynamic web are searching engines, remote access to corporate applications and databases, etc.
CGIs
Note: We do have several ways of implementing the dynamic Web. In this document, we will only explain CGIs, as they are easier to understand, and they were the first method used for that specific purpose.
CGIs or Common Gateway Interfaces are a standard procedure through which HTTP servers can use external applications to dynamically generate content.
When we want to use a CGI, in the URL we must identify:
- An executable program (the CGI itself)
- The parameters with which the CGI has to be executed.
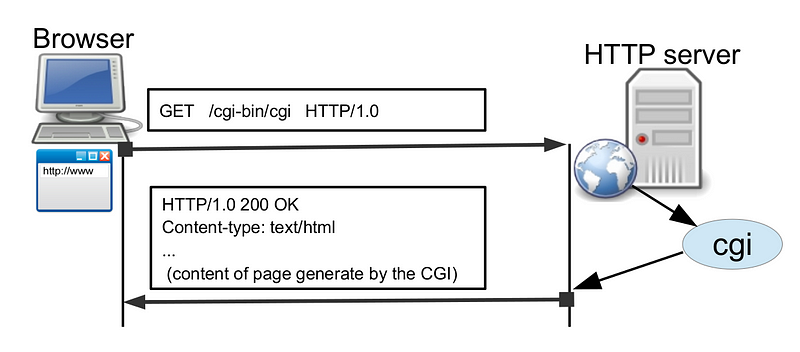
However, when we use CGIs we find some issues we need to solve.
The first one is how a web server knows that is has to execute a program instead of sending a resource. → A usual solution is to store all the CGIs in a special directory, typically called /cgi-bin/. In this way, if a client asks for www.examplecom/cgi-bin/program the server knows that it must execute program instead of sending it.
The second is how to send the parameters to the program. When we use GET, the parameters are encoded in the URL. These parameters are added to the URL after a “?” character, and separated by the character “&”.
Example:
http://www.example.com/cgi-bin/program?param1=value1¶m2=value2...Note: Spaces are translated into the ‘+’ character, and ASCII characters can also be sent in the %NNN format.
Finally, before executing the CGI, the Web server establishes a special context for the program using environment variables, to ensure a correct execution of it.
These variables are:
CONTENT_LENGTH, CONTENT_TYPE, REMOTE_HOST, REMOTE_USER, REQUEST_METHOD, SERVER_NAME, QUERY_STRING, GATEWAY_INTERFACE, HTTP_’VERSION’
For GET requests, the QUERY_STRING variable takes the value of the parameters and the CGI can use them as the client has specified.
For the response, the CGI writes it to the STDOUT. Then the server reads this answer and sends it to the client through the socket.
Depending on the type of web server, the CGI application can act in two different ways:
- NPH Server (No Parse Headers) → The CGI writes the complete response including the HTTP headers.
- PH Servers (Parse Headers) → The CGI writes the complete response without the HTTP headers, and it must pass information on how to form them.
The most common web servers are NPH.
Finally, it should be remarked that CGIs are not the most efficient solution because a process is created per request, and nowadays there are too many requests to be handled in this way.
Today’s more efficient solutions to create dynamic websites are languages like Javascript, Python, PHP, Java servlets, etc.
Other (common) methods in Requests: HEAD and POST
- The HEAD method is used when we want a response only with the status line and headers (without a body).
HEAD is useful when the resources from the server are not actually needed. This can be the case in which we need to make some tests but we do not want to download a resource (which can be heavy)
- The POST request is used for dynamic Web. The difference between POST and GET is that POST requests use the body of the request to send parameters instead of coding the parameters directly into the URL.
CGIs with POST use the STDIN to receive the request body (program’s parameters) instead of using the QUERYSTRING variable
HTML Forms
An HTML form allows a client to send parameters to a WEB server.
The tag to declare a form is <form> … </form> where different elements can be inserted inside, like text input elements, codes, images, checkboxes…
These elements are inserted into the form using the tag INPUT. All items of the form have a “type” attribute and they might have a “name” attribute.
There are 2 special elements in forms: RESET, which clears the form to its initial state, and SUBMIT, which presents a button to send the form to the server.
Example of an HTML form, and how it is displayed in the browser:
<html>
    <head>
        <title> Website title </title>
    </head>
    <body>
        Form to select parametres to send to the server.
        <form ACTION="/cgi−bin/process" METHOD="GET">
            Enter a name: <INPUT NAME="a" TYPE="text"> <br>
            Enter a password: <INPUT TYPE="password" NAME="b" 			MAXLENGHT="8"> <br>
            Checkbox: <INPUT TYPE="checkbox" NAME="c"> <br>
            <INPUT TYPE="reset"> <INPUT TYPE="submit">
        <br>
        </form>
    </body>
</html>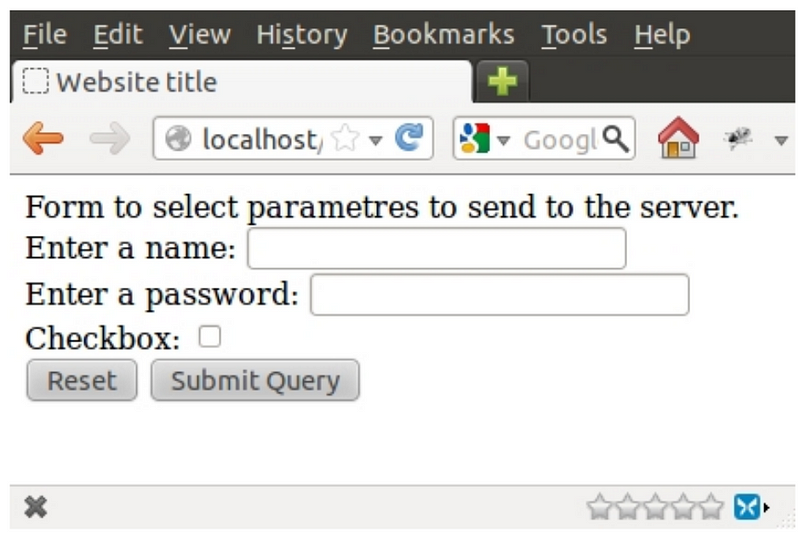
When the form is submitted, the client generates an HTTP request using the method showed in the METHOD attribute (GET in this case), to execute the script or application indicated in the ACTION attribute.
The most common question regarding Dynamic Web is: Should I use GET or POST?
Each method has its advantages and drawbacks.
GET
When using GET, the parameters are encoded in the URL. This can be useful in many cases, but if we want to protect some sensible information, the GET method could cause security vulnerabilities, because the parameters will be shown to everyone in the URL.
Another drawback of GET is that it does not allow to send binary files in the body of the request.
However, GET is useful to perform requests and store the results together with the associated URL.
GET also allows to use the back buttons to go to previous results.
POST
With POST, the parameters are sent in the body of the request, so the parameters are not visible in the browser as a query string.
In general, GET is useful for operations which always give the same results (idempotent).
POST means “carry out” an action with a “side effect” or a change of state (non-idempotent operations).
HTTP 1.1
Introduction
The main difference between protocols 1.0 and 1.1 is that on 1.1 it is compulsory to add a HOST header
The most important improvements made to the protocol are the following ones:
Host Header
Provides (a more) efficient use of IP addresses. With 1.1, multiple domains can be served from a single IP address.
For example, we could have www.example.com and www.example.net on the same server. Thus, HTTP1.1 must specify in the header to which host the request is destined. A minimal HTTP 1.1 request with the hostname would be something like:
GET / HTTP/1.1
Host: www.example.com:80
[blank line]
Where we can see the domain name (or IP) of the WEB server, and the port number (in this case 80, as it’s the default port for HTTP).
Chunked Encoding.
Allows a faster response for dynamically generated pages. Pages are divided and sent in chunks (fragments). This way, responses can be sent before its total content or length is known.
When we use HTTP 1.1, it does send the body of the message as several fragments, followed by a line with a “0”. Optionally followed by the page footer.
Each chunk consists of two parts:
- A line with the size of the chunk in hexadecimal + CR + LF
- Data + CR + LF
(CR + LF == blank line)
Example WITHOUT chunks:
HTTP/1.1 200 OK
Content-Type: text/plain
Content-Length: 42
[blank line]
abcdefghijklmnopqrstuvwxyz1234567890abcdef
Same example WITH CHUNKED DATA:
HTTP/1.1 200 OK
Content-Type: text/plain
Transfer-Encoding: chunked
[blank line]
1a
abcdefghijklmnopqrstuvwxyz
10
1234567890abcdef
0
[blank line]
Persistent Connections
A TCP connection is not opened/closed for each request. By allowing multiple HTTP transactions in every TCP connection, we can reduce the total transmission delay.
In HTTP 1.0, TCP connections are closed after each request/response by default.
As we know, opening/closing TCP connections requires a substantial amount of CPU time, bandwidth, and memory. In practice, most web pages consist of several files (linked HTML documents, images, etc.) that are located on the same server.
Consecutive requests (and their associated responses) can be more efficiently transmitted by allowing multiple requests/responses to be sent over a single connection.
In HTTP 1.1, persistent connections are used by default.
Once the client decides it doesn’t want to send any more requests, it sends a request with a Header which includes: “Connection: close”.
Then the server has to close the connection after the reply.
If the server is the one who sends the header with “Connection: close” then the client cannot send more requests, and it must close the connection after the response is received.
*Note that a server may close a connection before it answers all the requests.
The HTTP 1.1 client can also send multiple requests through a single connection without having received any response (pipelining).
On its side, an HTTP 1.1 server must store queued requests while it cannot process them, and it must send the responses in the same order as it received the requests. If a request includes the header ”Connection: close” , the server must interpret this as that the request is the latest and it must close after sending the corresponding response.
Finally, it is worth to mention that typically, clients (browsers) open several simultaneous persistent TCP connections with each server.
Caching
Headers to implement caching are provided with HTTP 1.1.
This allows a faster response and bandwidth saving.
All the responses (including errors) except the “Continue” ones (status 100) should include the header ”date“. This header provides a time stamp which is used by HTTP 1.1 to implement caching. These time stamps use the Greenwich Mean Time (GMT).
There are two headers called ”If-Modified-since“ and ”If-Unmodified-Since“ that can be included in HTTP requests.
Continue
When we want to send a message with a big body (big file), we can use the “Continue” (status 100) mechanism.
This mechanism is used to determine if we do really want to receive a message or not, as if we cannot process it, we can save time and resources by rejecting the message.
To use the Continue mechanism, clients must include the header: “Expect: 100-continue”. Then if the server is going to process the request must respond with 100 (Continue) status.
Note: A client should not send the Expect header if it’s not going to send any body in its request.
As a final remark, it is worth mentioning that
HTTP 1.1 clients should:
• Include host header in each request.
• Accept responses with chunked data.
• Accept persistent connections or include the header ”Connection: close”.
• Manage the response ”100 Continue”.
HTTP 1.1 servers should:
• Require the host header in requests.
• Accept absolute URLs.
• Accept ”chunked” requests.
• Manage persistent connections (or use the header “Connection: close”)
• Properly use the status ”100 Continue”.
• Include the date in the header ”date” in each response (except Continue).
• Manage requests with headers “If-Modified-Since” or “If-Unmodified-Since”
• At least, support the methods GET and HEAD.
• Support HTTP 1.0 requests.
NGINX
Introduction
NGINX (pronounced “engine x”) was born as a reverse proxy with minimal HTTP WEB server functions.
It addresses most of the server activities performed in the web world, such as:
- Serving static content (i.e. static web pages, files, etc.).
- Dynamic content provisioning (e.g. using FastCGI)
- Caching content to speed up service provisioning.
- Load balancing for any TCP or UDP service (e.g. HTTP requests, DNS resolution requests, etc.).
- Securing channels for applications not supporting HTTPS connections.
NGINX can run in several platforms, including Linux, FreeBSD, Windows and MacOS. Without going into the technical details, developers and network engineers tend to prefer nginx over Apache as:
- It’s easier to configure.
- It scales better in terms of resources and performance as the load increases.
- It is extremely flexible: provides load balancing, cache, web server, etc. in a single piece of software.
Debian-based distros store the nginx configuration files in the directory /etc/nginx.
NOTE: if you change the configuration of the daemon you have to stop and start it to apply the changes.
To stop nginx type:
# /etc/init.d/nginx stop
To start the daemon:
# /etc/init.d/nginx start
Virtual Hosts
A virtual Host is a web site served by the HTTP server. Each virtual host has it¡s on configuration file, which can be found at:
/etc/nginx/conf.d folder.
Apart we can find a list of available virtual hosts at /etc/nginx/sites-available
The default virtual host is (unless we modify it) the first configuration file, but we can also specify a virtual host by including the default_server keyword next to the listening port inside its configuration file.
CGIs with nginx
CGIs are not directly supported by nginx, but we can use the FastCGI library to provide the CGIs functionality along with nginx.
Load Balancing
One of the most useful features of the nginx server is the capability to balance the load.
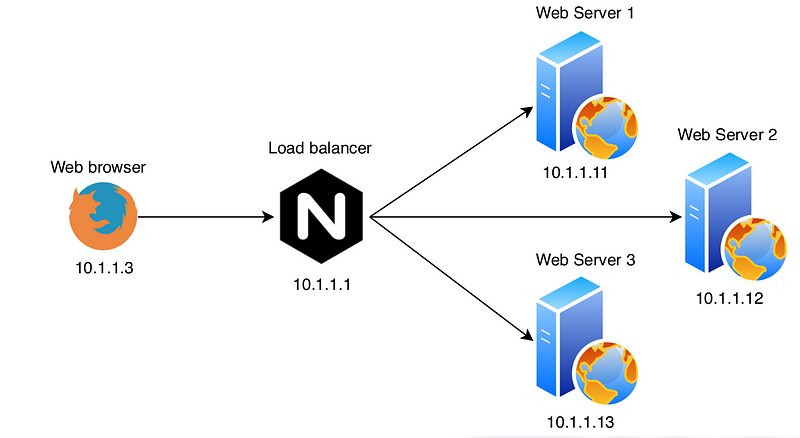
We can achieve load balancing just by creating and upstream configuration as:
upstream tcgi−app {
    server www1.example.com;
    server www2.example.com;
}
server {
    listen 80;
    server_name www.example.com ;
    location / {
        proxy_set_header X −Real−IP $remote_addr ;
        proxy_set_header X −Forwarded−For $remote_addr ;
        proxy_set_header Host $host ;
        proxy_pass http://tcgi-app$request_uri;
    }
}
The nginx server provides several approaches to balance the traffic:
- Round Robin: The default approach
- Least busy: NGINX will try not to overload a busy server with excessive requests, distributing the new request to a less busy server instead.
- Session Persistance: The clients are tied to a particular application server per session.
- Weights: It is also possible to assign a certain weight to a server. This is interesting when using the Round Robin approach, and we can use the
weightparameter next to the server configuration to weight the traffic addressed to that server.
HTTPS
Up to this point, we’ve been seeing how does the HTTP protocol work, but we’ve encountered many times the same problem… Security.
To solve this issue, a new protocol had to be implemented, and as you may have guessed, the protocol was HTTPS.
To implement this security layer on top of HTTP, different cryptographic methods have been used.
The main algorithms used to implement HTTPS are the following ones:
1. SYMMETRIC Cryptography
What does that even mean? It just means that either the sender and the receiver use the same key both to encrypt and decrypt the message.
It does NOT mean that same algorithms are used, nor that the messages are encrypted in a symmetric way, simply that the same key is shared.
That’s why it’s also called Symmetric key cryptography, or shared secret cryptography.
The most used algorithm en symmetric cryptography has been the DES (and triple DES), until the AES was invented, which can have longer keys than DES.
Using this cryptographic systems we won confidentiality in our message sharing process through the internet, but another problem is detected when using symmetric cryptography, and it is the fact of sharing keys between participants, as they should know each other and share they key between them before initiating the data transmission.
2. Asymmetric Cryptography
Brought by the problem that we just described, another type of Cryptography appeared, where sender and receiver do NOT need to share any secret nor key. This is called Public Key Cryptography.
In this type of cryptography, each user has a pair of keys:
- A public key (everyone can see it)
- A private key (only the user knows it)
- One of them will be used to encrypt the message (public), and the other one to decrypt it (private).
Asymmetric algorithm example
Alice wants to send an encrypted message to Bob. To do it using asymmetric cryptography she does the following:
- Alice uses Bobs Public key to encrypt her message.
- The message is encrypted thanks to Bobs Public key, and it is send to Bob (now only Bob’s key can decrypt that message, no one else, not even Alice)
- Bob receives the encrypted message and he uses its Private key to decrypt it, and this way he can read the message.
- The most used algorithms in Asymmetric Cryptography are RSA, DSA (Digital Signature), ECDSA…
3. HASH Function
The Hash function appeared due to the performance problem we had when searching for data inside DataBases, which were usually alphabetically sorted.
It was seen that using the hash function was MUCH more efficient as:
- A number is assigned to each message’s character.
- All this numbers are added.
- The 100 module is applied to the result of the previous step.
- We obtain the HASH value.
This HASH value is much easier to fins inside a DB.
One of the main characteristics of the Hash function is that it doesn’t matter the variable inputs that it gets, but the output is always fixed.
A problem that this may cause is that multiple inputs can produce the same output, and so collisions appear.
So how can we reduce the collision probability?
- Increment the module operation (mod10000)
- Use a different codification (p.ex. ASCII)
But is there a way to achieve a virtually impossible collision probability?
— > Using the CRYPTOGRAPHIC HASH
This algorithm uses SHA256, which works like this:
- We introduce a variable Input
- Returns 256 bits (output)
The difference is that now is practically impossible to guess which is the original message only from the output (only with brute force attacks).
So as we cannot return to the original message, it is possible that collisions appear, but we won’t know where this collisions come from.
4. Digital Signatures
Digital Signatures generation:
- Alice calculates the message hash (HASH FUNCTION)
- Alice encrypts the hash with her private key (RSA)
- Alice sends the message and the signed hash to Bob.
(Note: The 256 bit hash identifies univocally the message, and the private key identifies Alice univocally)
- Bob receives the encrypted message → He calculates the message’s hash.
- He decrypts the signed hash using Alice’s public key.
- If both keys coincide, the signature is valid, and Bob can access the message.
5. Hybrid Cryptography
We can divide the message that we want to send in blocs, encrypting each block with the public key from the destiny.
Asymmetric cryptography is more secure, but Symmetric cryptography is faster.
With a combination of them both we can achieve much better performance.
To use them together we can do it like this:
- Asymmetric Cryptography is used to exchange a session key
- Then Symmetric Cryptography is used to share the encrypted data.
6. Digital Certificates
The Digital Certificates contain:
- Camps to describe the identity
- Serial Number
- Validation Period
- The Public Key algorithm
- The CA Public Key
- The algorithm used to sign the certificate
- Camps with the certificate’s purpose and additional information
7. OpenSSL
OpenSSL is the most used implementation to create and manage keys and certificates
8. HTTPS
Finally, after doing a quick cryptography introduction we can get back to HTTPS.
This protocol is implemented with the security that our data cannot be intercepted while it is traveling through the internet.
WebApps use Hybrid Cryptography and Digital Certificates to secure their transactions.
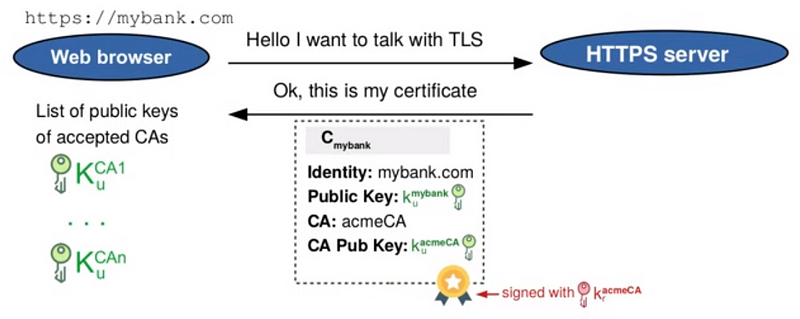
To secure the transactions, the browser does various security checks to make sure that we are connected to the correct server:
- Is the Digital Certificate well signed?
- Do I know the CA public key?
- Has the certificate expired?
- Is the URL the same as the certificate’s one?
Note: Browsers have lists of Public Keys from CAs, to be able to comply with point 2.
TLS Tunnel:
To prove that we are connected to the correct server the following steps need to be checked:
From the Browser
- A Symmetric Session Key is generated (Ks) and sent to the server.
- The Session Key is encrypted with the Public key that appears on the certificate.
From an HONEST Server
- It will have the corresponding Private Key (Kp) to our Public Key (Ku) (if the server was not the correct one, it would not have the Private Key).
- The message is decrypted using the corresponding Private Key, and we send the Session Key back to the browser to demonstrate that we are the correct server, and that we have the Private Key that is needed.
And this would be an introduction on how does HTTPS work, and the methods used to secure or communications online.
This is not at all everything that the HTTP protocol involves, as other versions like HTTP 2.0 and 3.0 exist, but we’ll not cover them here.
However, I hope this article provides a solid basis to understand an overall picture on this protocol, and if you still have any doubts, hit me up at [email protected], I’ll be happy to share thoughts with you!
If you want to check my previous articles to understand some other Internet concepts feel free to do so!
- Chapter 1: Ethernet, Switching & VLANs
- Chapter 2: IP Basics
- Chapter 3: Network Apps
- Chapter 4: DNS
- Chapter 5: DHCP
Leave a clap if you enjoyed this post, you’ll support my work and help me keep myself motivated to write more! Knowledge is power!