Internet Educational Series #3: Network Applications
SSH, FTP, TELNET, Netcat… Learn how to use Linux devices like a pro with these Networking Tools

Welcome to the third chapter of the Internet Educational Series.
Here you’ll learn all the basics from the Internet, how does it work, why does it work, the protocols used, and many more you’ll discover as you read through my articles.
I hope you like them, and enjoy them as much as I’m doing when writing them.
Let’s get into it! Today we are talking about the Basic Network Applications, how are they built from scratch, and some examples on how to use them.
I’ll start from the beginning, trying to make everything understandable for everyone, even if you haven’t got a tech background.
If you want to check my previous articles to understand some other Internet concepts feel free to do so!
Transport Layers
Transport Layer Motivation
The network layer is a scalable way of interconnecting data link layer technologies.
Basic IP provides an interface (NIC-to-NIC) best effort service for delivering datagrams, which means that a correct delivery of datagrams is not guaranteed, there might be lost datagrams, incorrect datagrams or disordered datagrams.
The main goal was to implement communications between processes that run generally in different systems, commonly known as end-to-end communications.
Here the concept of PORT was introduced, for multiplexing and demultiplexing this communications.
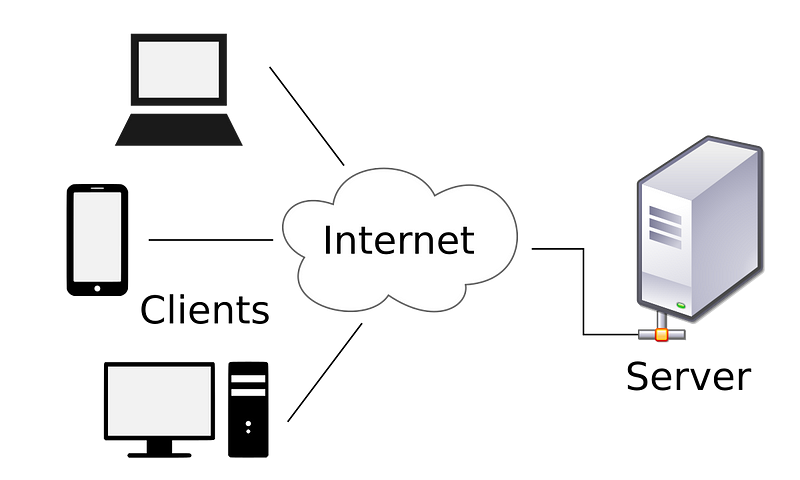
The port concept led to working in client-server models for each once a communication was established. This means that there is a server who is running a daemon in the background, executing the process continuously, and users, who act as clients, make requests to this servers to access the information they want.
To identify the different processes that are running, Unix-like systems use the Process Identifier (PID), however for multiplexing transport communications we want a generic identifier, which is the actual PORT.
So, a port is just a parameter for multiplexing that is dynamically assigned to any running process that requires a transport communication with another process.
Each transport PDU carries:
- A source Port (SPort) that identifies the process sending the PDU
- A destination Port (DPort) that identifies the process in the destination host
We are now going to see the main transport protocols used on the Internet.
User Datagram Protocol (UDP)
- UDP is the simplest transport protocol
- It is a message-oriented protocol (datagram protocol)
- Each UDP message is encapsulated over an IP datagram
- UDP only offers multiplexing capabilities (using ports) and a checksum for discarding wrong data
- UDP does NOT provide error, flow or congestion control
Transport Control Protocol (TCP)
- TCP provides applications with a full-duplex communication, encapsulating its data over IP datagrams
- TCP is connection-oriented because there is a handshake of three messages before data can be sent
- Apart from multiplexing capabilities, TCP is a reliable protocol because it adds support to detect errors or lost data and retransmit them (ARQ end-to-end error control)
- TCP also supports end-to-end flow control and congestion control
With this two protocols, we can make sure that our data is properly sent, and check that the channels where we want to send the data are accessible before sending it.
Client/Server model
As we have seen previously, the client/server model is the most widely used model for communication between processes. Clients make requests to the servers, and servers respond and they can generally support numerous clients.
In Unix-like systems, servers processes are also called daemons. In general a daemon is a process that runs in the background, and typically they have names that end with the letter “d” (e.g: telnetd, ftpd, httpd…)
Clients initiate the interprocess communication, so they must know the address of the server.
Luckily, there are a list of well-known ports.
The client usually knows the IP of the server, and there is a well-known transport protocol and port determined by the application used.
For example, HTTP servers (for the Web) use TCP/80, DNS servers use UDP/53 for name queries, and the DHCP servers use UDP/67.
The command netstat (network statistics) shows established or listening sockets and several related statistics.
Socket API
TCP/IP communications were developed in the context of Unix systems. One of the main ways of implementing TCP/IP communications is to use the “socket” API.
An application programming interface (API) is an interface implemented by a software program to enable interaction with other software.
It may include specifications for routines, data structures, object classes and protocols used to communicate between the consumer and implementer of the API.
Netcat
The netcat application can be used to create a process that opens a raw TCP or UDP socket as a client or server.
It is so useful for testing networks, that it even is known as the “Swiss Army Knife of networking”.
- If we want to use netcat as a client:
nc hostname port - If we want to use it as a server:
nc -l -p port—> we add the -l parameter, which stands for “listening”.
Note that a netcat server is NOT multiclient.
We can use netcat too to transfer files, create remote terminals, take a look at open files, etc.
Let’s see an example:
If we want to transfer files, we can create a netcat server in the device we have the files stored, and then run a client connection in the device we want to transfer the data to:
server# cat file.txt | nc -l -p 12345 -q 0The -q 0 option closes the connection once the file has been transferred.
Now we can create a client connection by tiping:
client# nc hostname 12345Basic Network Applications
Great, now you know how the transport layers work and how we can establish connections between clients and servers, so let’s dive into some of the basic applications that use this technologies.
In this section we will be talking about:
- TELNET
- FTP
- SSH
- Super Servers
TELNET
What is TELecommunication NETwork?
TELNET is a standard Internet protocol for emulating a terminal in a remote host using an IP network.
The TELNET service uses TCP, and it is a well-known port, that uses port 23.
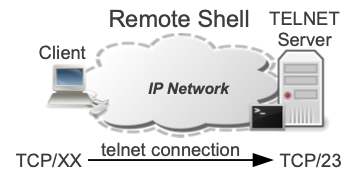
To use the client, you just need to open a terminal and type telnet. After you type the command, you will enter the telnet “sub-shell”, where you’ll be able to type specific commands of telnet.
The most used and useful subcommand is open hostname, which starts a connection with the specified IP address or hostname with the port 23 (this is the default port, but you can specify a different port after the IP address).
You can also type the subcommand help to obtain a list of possible subcommands.
Let’s see a practical example on how to open a TELNET connection.
$ telnet
telnet > open 192.168.0.1
Note that you need to be in the same network as your server to be able to access it.
You can also use the parameters directly in the command line:
$ telnet 192.168.0.1 23You can exit the remote terminal when you want by typing “exit”.
Things to keep in mind with TELNET:
Many times telnet clients are used to establish an interactive raw TCP connection. Despite most of the times there will be no problems with this, it mush be taken into account that the telnet client can alter the data sent, as the value 255 is altered. If you want a pure raw TCP connection, you should use the netcat tool.
Finally, it is worth to mention that because of security issues with telnet, its use for the purpose of having a remote terminal has waned in favor of SSH.
FTP
What is a FTP (File Transfer Protocol)?
FTP is a standard Internet protocol for transmitting files between computers (hosts) on the Internet. FTP uses IP and it is based on a client-server model.
FTP uses separate control and data connections between the client and server.
The default server port for control data is 21, and the default server port for data exchanging is 20.
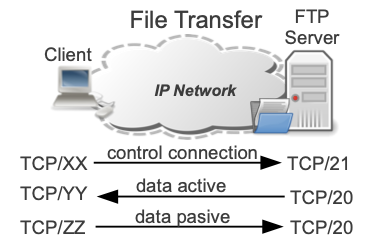
The control connection remains open for the whole duration of the session, and it is used for session management (commands, parameter negotiations, passwords, etc.) exchanged between the client and the server.
Due to this 2-port structure, FTP is considered an out-of-band, as opposed to in-band protocols such as TELNET.
The server responds to control connection with three digit status codes in ASCII, with an optional text message, for example “200 OK” means that the last command was successful.
Active and Passive modes
The mode FTP is run, determines how te data connection is established.
- In active mode the client sends the server the IP address and port number on which the client will listen, and the server initiates the data connection.
- In passive mode the client sends a PSAV command to the server, and receives an IP address and port number in return.
Data transfer modes
Data transfer can be done in any of three modes:
- Stream mode: Data is sent to a continuous stream, relieving FTP from doing any processing. All processing is left to TCP.
- Block mode: FTP breaks the data into several blocks (block header, byte count and data field) and then passes it to TCP.
- Compressed mode: Data is compressed using an algorithm
Practical FTP
Next we discuss the ftp command line client and ftpd server for Linux.
The ftp client supports active and passive mode, and only stream mode.
To connect to a ftpd server we can use one of the following options:
$ ftp name
$ ftp 192.168.0.1
$ ftp [email protected]
To establish an FTP session you must know the ftp username and password. In case the session is anonymous, typically, you can use the word “anonymous” as both username and password.
When you enter your own login name and password, it returns the prompt ftp>, which is a subshell where you can type several subcommands.
Finally, it is worth to mention that you can also use FTP through a Browser, like:
ftp://ftp.upc.edu
ftp://[email protected]
ftp://ftpusername:[email protected]
SSH
Secure SHell is a protocol used to obtain an encrypted end-to-end TCP connection between a client (ssh) and a server (sshd) over a TCP/IP network. The sshd daemon listens to port 22 TCP by default. SSH encrypts all traffic, which ultimately eliminates eavesdropping, connection hijacking, and other attacks.
Services with SSH
Remote Terminal
The first example is to use ssh client to connect to a sshd server to obtain a remote terminal. The same idea as TELNET, but secure.
You can achieve this by typing: user1$ ssh 192.168.0.1
The previous command will try to establish a SSH session over a TCP socket between the client ssh and sshd server listening on 192.168.0.1:22.
By default, SSH assumes that you want to authenticate with the user you are currently using.
If you want to use a different user for login on the remote host, simply use: remoteusername@hostname like this:
user1$ ssh [email protected]With SSH we can also transfer files securely between machines on a network.
We can do this with SCP and SFTP.
SCP (Secure Copy)
The command scp is essentially a client program that uses the SSH protocol to send and receive files over and encrypted SSH session. You can transfer files from the client to the server and vice versa.
Let’s see a simple command that copies a file called file.txt from the client to the server, to the home directory of the user “username”:
$ scp file.txt username@remotehost:If you want to specify a new directory and a new name for the file, you can do it this way:
$ scp file.txt username@remotehost:mydirectory/anothername.txtTo recursively copy a directory to the server, use the “-r” option:
$ scp -r Documents username@remotehost:And finally, to copy from the server to the client just reverse the from and to:
$ scp username@remotehost:file.txtSFTP (Secure FTP)
SFTP is a secure implementation of the traditional FTP protocol using a SSH session. Let us take a look at how to use the sftp command:
$ sftp user@hostnameStart/Stop sshd
Each time you change the configuration of sshd you have to stop and start it to apply the changes.
You can do it this way in most Linux systems:
# /etc/init.d/ssh stop
# /etc/init.d/ssh start
Super Servers
A way of implementing a network service is to use a stand-alone daemon. A stand-alone daemon listens to a port and serves client requests associated with that port.
However, for simple services that are used not very often it is more efficient to use a “super server” or “super daemon”.
A super-daemon listens to several ports. They use memory more efficiently.
On the other hand, a dedicated or stand-alone server that intercepts the traffic directly is preferable for services that have frequent traffic.
In Linux inetd is the typical super-daemon.
Each time a client requests a service managed by inetd, the super-daemon uses its configuration file (/etc/inetd.conf) to determine which server program should manage the request and executes the corresponding server program.
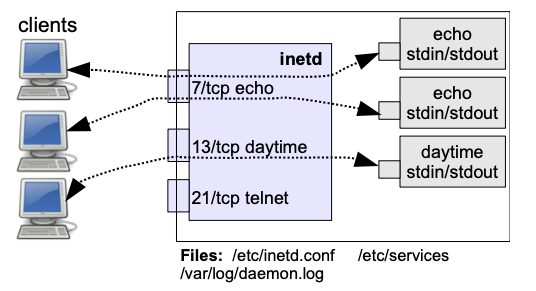
- For each TCP connection, inetd creates a process and connects STDIN and STDOUT of this process to the socket established with the client.
- UDP sockets are generally handled by a single application-specific server instance that handles all packets on that port.
- Some simple services such as “daytime” are handled directly by
inetd, without spawning an external application-specific server.
Configuration
The inetd super-daemon is configured using the file /etc/inetd.conf .
Each line in the file contains the following fields:
service_name socket_type {wait|nowait} user server_program [server_program arguments]For example, the configuration line for the TELNET service is something like:
telnet stream tcp nowait root /usr/sbin/in.telnetdOtherway, service names and ports are mapped in the configuration file /etc/services.
You can check the default port for the telnet service typing:
$ cat /etc/services | grep telnet

telnet 		23/tcp
...
The last file important to mention is the /var/log/daemon.log, where inetd writes its messages.
Start/Stop inetd
Each time you change the configuration of inetd you have to stop and start it to apply the changes. It can be done as follows:
# /etc/init.d/openbsd-inetd stop
# /etc/init.d/openbsd-inetd start
Creating a Service under inetd
Follow this steps to create a service under inetd:
- Create the server program using STDIN and STDOUT.
- Choose a name and a port for the service.
- Set the port/name of the service in the /etc/services file.
- Start and stop
inetd
Let’s configure the service “my-echo” following the previous steps:
- Add the configuration file in /etc/inetd.conf
- my-echo stream tcp nowait root /root/my-echo.sh
- Restart
inetdand observe the log file where inetd writes its messages: - # tail -f /var/log/daemon.log
- inetd[1173]: my-echo/tcp: unknown service
- Add a port number for our service in the file /etc/services:
- my-echo 12345/tcp
- Restart inetd and try to connect to the service. Let’s observe the log file
- # tail -f /var/log/daemon.log
- execv /root/my-echo.sh: No such file or directory
- We need to create the file as it indicates in the previous message:
- cat
The command cat without parameters, writes to STDOUT what it reads from STDIN.Let’s take a look again at the log file:
# tail -f /var/log/daemon.log
inetd[1173]: my-echo/tcp: Permission denied- Give permisions to the script, and get back to the logs file:
- chmod u+x /root/my-echo.sh
- #tail -f /var/log/daemon.log
- inetd[1207]: execv /root/my-echo.sh: Exec format error
- We need a “formally correct” script, and to do so we need to add the following initial line with the corresponding interpreter
- #!/bin/bash
- cat
We will now create a netcat client connection to check that the my-echo service is working properly.
You can observe the connections of the services with the lsof command, and check that the STDIN, STDOUT and STDERR of the processes are connected to the corresponding socket
virt1# lsof -a -p 1216and we see that the 0, 1 and 2 FD are established correctly.
Voilà! We’ve got the service configured.
Alright, I know this has been a long journey, but congrats if you made it up to this point! Take your time to digest everything we’ve been seeing so far, and if you still have any doubts, hit me up at [email protected], I’ll be happy to share thoughts with you!
If you want to check my previous articles to understand some other Internet concepts feel free to do so!
Leave a clap if you enjoyed this post, you’ll support my work and help me keep myself motivated to write more! Knowledge is power!